Sunday, October 31, 2010

Bierocks

I made these last night.  Bierocks.  Go to that link for the crust recipe because I improvised and my crust was not nearly as nice as hers.  It was dry and I was upset that they didn't look very pretty.  The good news is that they tasted fantastic, crust included!  So what I did was great, just not very eye-catching. 

For the filling I just made it up as I went along.  But here is the list of what I used:

* 1 head purple cabbage, chopped
* 1 small eggplant, peeled and cubed
* 1 package sliced mushrooms
* 1/2 small chopped onion, chopped
* 1 large bag frozen, thawed, drained spinach
* 1 cup ricotta cheese
* 1/4 cup shredded cheese of choice
* EVOO
* salt and pepper to taste


Saute the onion and cabbage in EVOO.  Once wilted, add mushrooms, then eggplant. 


Add spinach.


Add cheeses.


Roll out 12 dough balls.  Fill with a few spoons of the mixture.  Fold up dough around mixture.  Brush with a bit of melted butter.


Mine were so crumbly that they kept breaking all over the place and there was just no way to flip them over with a seam side down.


But it turns out it didn't matter.  They tasted fantastic.  Two made me feel REALLY full at dinner.  After they cooled, I wrapped most of them individually in plastic wrap and stuck them in the freezer.  They make a fantastic single girl dinner or hot lunch. 

I know they look small but they are surprisingly filling.  You could certainly use up leftover meats or make mini calzones.  I'm pretty excited to have some ready-made meals in the freezer. 

Saturday, October 30, 2010

Bakery On Main

I was lucky enough to sample some tasty breakfast treats from Bakery On Main.  This was a big treat and I discovered that the granolas are actually sold in my Price Chopper (regular grocery store like Kroger and Publix).  I plan to continue eating these in the morning.  So yum-o!


I love love love their packaging.  If I've said it once, I'll say it a thousand times that I am a big sucker for great packaging.  And I love that their philosophy is "food that is good for you should taste good too!"  Bakery On Main worked hard to find ingredients that were certified GF to ensure that no cross-contamination situation would make customers ill.


There was not a single product that I didn't LOVE.  I enjoyed each packet of granola with almond milk and they were good to the last drop.  I am trying to lower my dairy intake and don't really love soy stuff but I bet they would be fantastic over yogurt.


The Nutty Cranberry Maple Granola was my absolute favorite!  I was excited to buy a big bag of it last week in the grocery store.  Delish!


All of these were great but my very favorite was the Extreme Trail Mix Granola Bar.  It has 5 grams of fat and 170 calories.  The granolas have between 6 and 12 grams of fat per half cup.  Higher in fat than a bowl of rice cereal but a really yummy breakfast treat all the same.

All of these products are all natural, gluten and wheat free, dairy and casein free, cholesterol free, and trans fat free.   Oh and they have a few fun recipes listed on their website too.  I love when companies think ahead and offer recipe suggestions to curious customers.

Friday, October 29, 2010

Creamy Pumpkin Soup

CREAMY PUMPKIN SOUP

Ingredients:
* 1 large can pumpkin puree (NOT pie filling)
* 1/2 med. onion, chopped
* 2 carrots, chopped
* 1 teaspoon minced garlic
* 2 springs fresh rosemary
* 2 boxes chicken or vegetable stock
* 1 cup cream or half and half or other milky product (like almond milk)
* EVOO
* salt and pepper to taste


Directions:
* Saute onion and carrots in a little EVOO until tender. 


* Add rosemary, garlic, pumpkin puree and chicken stock.


* Add cream/milk.  Fish out the rosemary stems.


* Serve with a yummy salad.

APPLE DRESSING

Ingredients:
* A few tablespoons apple cider vinegar
* 1 teaspoon pure maple syrup
* A few tablespoons apple sauce
* EVOO
* s/p to taste

Directions:
* Put everything in a container with lid.  Shake.  Serve. 
* The amounts will vary depending on your taste and servings.  If you don't have maple syrup, just use more applesauce.  The great thing is that with the applesauce, you use significantly less oil and it is still nice and thick.

Thursday, October 28, 2010

Pizza Take Two...

I made my first homemade gluten free pizza.  It was very easy and much better than Amy's.  But still not perfect.  Really I just need to give up the dream that I will ever eat a NY slice again.  I'll still play around with recipes until I find the right balance though.  Oh and as I was about to pour in my yeast, I realized it was expired.  I looked at every package of yeast in my house and they were all expired.  Some I bought recently too.  Drats.  I used the least expired package.  Haha- as much as I love Martha and Ina, I better relate to Rachel and Sandra. 

In the end, it was pretty dense.  As are all things GF.  But I think it might be less so if the yeast had not been expired.  The flavor was lovely and actually tasted like...wait for it....whole wheat.  I bet if I didn't tell you it was GF, you would think it was whole wheat.  I know, surprising. 

I adapted this recipe.

INGREDIENTS:

*1/4 cup sorghum flour
*1 cup rice flour
*1/4 cup cornstarch
*1/2 cup potato flour
*2 teaspoons xanthan gum
*3/4 teaspoon salt
*1 1/2 Tablespoons sugar
*1 teaspoon sugar for proofing yeast
*2 1/2 teaspoons active dry yeast
*3/4 cup warm water
*2 Tablespoons ricotta cheese
*2 eggs
*2 1/2 Tablespoons olive oil
*1/2 teaspoons apple cider vinegar
*1 Tablespoon Honey

DIRECTIONS:

*Place your pizza pan or stone in the oven and heat the oven to 170 degrees to get it warm.
*Prepare your liquid ingredients. Mix the olive oil, egg, ricotta cheese, honey, and vinegar in a medium bowl and set aside so the mixture comes to room temperature.
*Combine all the dry ingredients and sift together in the bowl of your stand mixer. Use the paddle (not the dough hook) for this recipe.
*Heat 3/4 cup of water in microwave. In a separate small bowl, place your yeast and the teaspoon of sugar. Mix with about 1/4 cup of the heated water, stir, and let it sit for a few minutes. Once you know the yeast is active, proceed with the recipe.
*At this point, you want to double check and make sure all your ingredients have come to room temperature. Turn the stand mixer on and give the dry ingredients a few twirls. Add the egg, ricotta mixture to the dry ingredients and give it another few twirls. Add the yeast mixture. At this point, gauge the liquid level. You want the dough to look like stiff cake batter. The dough should still hold the swirls of the mixer, but it should be shiny and not dull. Add water slowly until the right consistency is achieved.  The original recipe added the full amount but I only needed about half. Since different brands of flour and measuring techniques vary, it is best to eyeball this and add the water slowly to get the texture you want. You will get good at knowing what gluten free pizza dough is supposed to look like.
*Once you have the pizza dough made, take the pizza pan/stone out of the oven. You can turn the oven off at this point and leave the light on in the oven. Fit the pizza stone with parchment paper or foil (do not use waxed paper) and lightly brush with olive oil. With oiled hands (I spritz mine with evoo spray), slowly spread the pizza dough batter in a 12-13 inch circle or rectangle. You want the batter to be evenly distributed. If you find your hands getting too sticky get a little more olive oil on your hands. 
*At this point, I put my pan back in the oven for a 40 minute rise.
*Once it has risen for 40 minutes, turn the oven to 375 degrees for 10 minutes to prebake crust.
*Then add toppings. Turn the heat up to 400 degrees and cook for 7-12 minutes, depending on toppings and thickness.

Makes 1 12-13 inch pizza crust.

Trying to rise in the oven with expired yeast.

For my toppings, I did a half and half pizza.  I used up a ripe tomato from my garden, fresh spinach, some dabs of ricotta and shredded cheese that I had on hand on one side.  The other side had a base of a peanut sauce, sauteed chicken, scallions, dabs of ricotta and a tiny bit of shredded cheese.

Saute the chicken in a little EVOO spray.


Before adding toppings, I brushed the entire top crust with a teeny bit of EVOO.


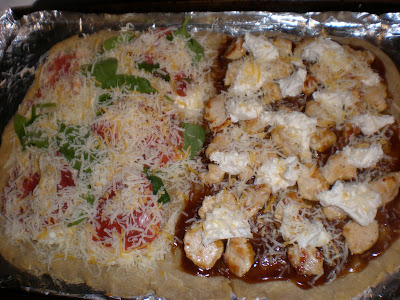
Ready to go into the oven.


Just out of the oven.  Smelled amazing!


Both were yummy but the peanut chicken was soooo fantastic!

Peas, Please!

I actually made this recipe a few weeks ago but as I am making it again tonight, I thought it was high time I posted the recipe.  Split Pea Soup.  Don't turn up your nose, friends.  It's soooo delicious!  A classic fall comfort food.

SPLIT PEA SOUP

Ingredients:

* 1/2 small onion, chopped
* 2 carrots, chopped
* 2 slices bacon, chopped
* 1 small ham steak, cubed
* 1 bag dried split peas
* chicken stock, vegetable stock or water
* EVOO
* salt and pepper to taste

Directions:

* Saute the onions in a little EVOO.  Add the bacon, ham and carrots.


* Add the bag of peas.  Toss so that they are completely coated in the onion ham goodness.


* Add chicken stock (or veggie or water).  I used two boxes of low sodium, low fat chicken stock and then towards the end added some more water too.  It will appear very watery after adding the stock.


* This is after about an hour.  Getting thicker but still very watery.  Don't worry.  This needs at least two hours to simmer.  Taste test to see if it needs any salt (it won't need much if it does because there is a lot of salt in the bacon and ham) and pepper.


* Two hours after starting, this is what you have.  Very thick and creamy.  Without adding a bit of flour or dairy.  The peas break down and melt into this deliciousness.  With the big chunks of yummy ham.  OMG I cannot even tell you how happy this soup makes me.  Crazy simple but soooo tasty. 


Oh do you see that white in the middle of the bowl?  Yeah I thought I would try adding a bit of sour cream.  I ate it but never added it again.  It doesn't add anything to the soup.  It's so creamy and yummy all on its own.  It's also very cheap to make.  A bag of split peas is less than a buck and the rest of the stuff is probably already in your pantry/fridge.  I usually eat it for two days and then freeze the leftovers in single servings to eat later.

Tuesday, October 12, 2010

Better Batter


I had the sincere pleasure of testing for review the above products by Better Batter.  Hands down the BEST gluten free products I have used to date.  Bob's might be easier to buy in your local grocery stores but Better Batter is moons and skies above Bob's in quality!!  I plan to put in a big order of the flour this week.  The price goes down per pound as your order increases.

First let's start with the packaging.  How cute are these boxes?!  Packaging gets me every single time.  But it sort of made me feel special.  So often, GF products are an afterthought.  On the bottom shelf.  In wrinkled bags.  Better Batter took the time to make their packaging cute and colorful.  It did not go unnoticed by me at all!


I made the most amazing brownies ever!  I made the mix exactly as directed but added in walnuts.  Non GF eaters and super skeptics were raving about them.  Oh and they are designed to fit in a 9x13" pan.  I don't know about you, but that drives me nuts when mixes are made for a tiny 9" square pan.


They were moist and fudgy and super yummy!  Not yummy for gluten free products.  Just plain old YUMMY!  Seriously one of the best brownies of all times. 


Better Batter's GF flour mix is amazing!  They nailed it right on the target with their combination.  I made this clafouti last week with Better Batter's flour.  And it was amazing!  I've made this pasta twice now with the flour.  Again, fabulous!!  I will be trying out the bread recipe on the side of the box this week.

Flour make up is as follows:
Rice flour, brown rice flour, tapioca starch, potato starch, potato flour, pectin, xanthan gum.  They note that the pectin is a lemon derivative.


The first thing I made with the Better Batter GF pancake/biscuit mix was biscuits to eat with pulled pork.  It seems that I neglected to take a photo of that but I think that everyone knows what a Bisquick-type biscuit looks like.  They tasted very similar.  Not identical but very very similar.  I gobbled mine up and then ate one again then next morning for breakfast.  A very fun breakfast treat!


Then this past week I mentioned that I was making breakfast for dinner.  This is what I made.  Pancakes, brown sugar baked turkey bacon (First time I've ever tried this and OMG amazing.  And I think that the healthier turkey bacon totally makes up for the added brown sugar, right?) and an omelet with spinach and feta cheese. 

Don't judge me by my pancakes.  It's time I come clean about something to y'all.  I am terrible at making pancakes.  I totally fail at making them round and pretty and I suck big time at flipping them and I am super impatient.  So I don't eat them very often because...well...you can see what they look like.  But you will be happy to know that they tasted amazing!  Tasted nearly gluten full.  If I had not had pancakes at a diner about five weeks ago, I bet I would not have even noticed a difference.  But you know, gluten full diner pancakes are in a league all their own.  These were a good, solid second to those though.  Very fluffy and full of lovely pancake-y goodness.  Made all the better because they were eaten for dinner!


Add lots of spinach and feta cheese, fold over and enjoy.  The salty feta was awesome in the same meal as the pancakes and brown sugar bacon.  Did anyone notice that my pots and pans are all pink and green?  Hehe!


I honestly cannot praise these products or this company enough! I am simply thrilled beyond words to these products. Unfortunately, I have yet to find them in a store in my area. But they are easily available online. And I am finding out that such is a staple of a gluten free life. Go here to read more about the awesome story behind the creation of Better Batter.

Monday, October 11, 2010

GF Pizza Take One: A Review


I wanted pizza tonight.  I had planned to make my own but stumbled upon this GF Amy's product in the market tonight.  Everyone raves about Amy's products so I thought I would give it a try.

For the record, I was in no way compensated for this review.  I got in my car, drove to my store, bought it with my moola, and drove back to my home to bake it up.  I have a receipt to prove that I spent $9.99 on this tiny pizza.  Living GF is about three times more expensive than living gluten full. 

But before we get started, let me point out a flaw in the Amy's company marketing plan.  I first suspected this might be Gluten Free because it stated rice flour crust.  But I had to pull it out and search the whole box to find out if it was in fact, GF.  Can you see it on the box?


It's in the bottom left corner in small writing.  Maybe they just expect GF folks to automatically know that this is a GF product but it is a crappy way to entice new customers to try the product.  Don't make me work hard to figure out if you are GF.  Proclaim it.  Loud and proud.


So this is the size of the pizza next to a glass 1 cup measure for your reference.  It's quite small.  I'd say about the size of 1.5-2 slices of NY pizza.  I also added extra cheese on top because I had some in the fridge.


And here are a few slices with some salad.  The results are that it is OK.  Not great.  Maybe not even all that good.  But it wasn't bad either.  A solid C.  I know that there are better possibilities.  And I am determined to make my own this week that is far tastier, healthier and cheaper.

I don't want to bash the product.  It wasn't terrible.  But the crust tasted very GF.  Gritty and with an odd aftertaste.  I have found over the last month that if I make things myself, they turn out nearly as yummy as the original.  And that is my goal at the end of the day.  To be kind to my insides but mind my pension for lots of yummy flavor too!


Friday, October 8, 2010

Creamy Potato Leek Soup

It was cold and rainy and yucky the other night.  So I made this up on a whim and am writing it down here to remember it.  Sooo good!  The perfect comfort food.

Creamy Potato Leek Soup

Ingredients:
* 2 tsp. butter
* 1 tsp evoo
* 3 slices of bacon, chopped small
* 2 leeks, washed well and chopped small
* 6-8 medium potatoes, chopped small
* 1-2 carrots, chopped small
* 1 box chicken broth
* water
* 1-2 cups milk or cream
* salt, pepper, nutmeg and cumin to taste

Directions:
* Saute bacon and leeks in butter and evoo.  Chop potatoes and add them to the pot.  Stir to prevent burning.  Add carrots. 


* Add chicken broth.  Then add enough water to cover all the veggies and make it soup-like.  You are just going to have to eye-ball this.

* Add seasoning to taste.  Be careful with salt as it is already in butter and probably your chicken broth.  I love freshly grated nutmeg in nearly everything.  It adds an extra yumminess.  Trust me.  Ditto on the cumin.  But again, to your own taste.  Lots of herbs would be nice so use whatever you have on hand.

* When the potatoes are tender, take a potato masher and mash it down a few times.  This will help thicken the soup without adding another thickener.


* Add 1-2 cups of whatever milky product you have on hand.  I used almond milk but if you have cream on hand, I bet that would be crazy good.

* Serve with a dollop of sour cream on top if you are able to eat dairy.


Wednesday, October 6, 2010

Clafouti

I found this great recipe for Clafouti and immediately knew I had to try it.  I used frozen, defrosted, drained blueberries.  And it was fantastic!  I made it as a desert but ate it again the next day as a breakfast.  The batter is very light- not terribly sweet.  Sort of like a giant pancake souffle.  I am posting the recipe I used, slightly altered from hers, because mine is both GF and DF. 

Clafouti


Ingredients:
1 cup fruit (I used blueberries)
3 tbsp flour
3 tbsp sugar
3/4 cup milk (I used almond milk)
2 eggs
1/4 tsp vanilla extract
Grated zest of 1/2 lemon (I didn't have a lemon on hand so I just tossed in extra vanilla)

Double or triple the recipe if needed. 

Directions:
Place all ingredients but fruits in bowl and mix well with mixer.
Add the fruit.
Grease your dish very well.  Like seriously don't skip this step!
Pour batter with fruit into dish and bake at 375 for 45 minutes.*


Before it went into the oven.  Pretty purple.


Just out of the oven.  All poofy and pretty.


Out of the oven a bit and it sinks down.  Don't worry, it tastes fabulous!


* I tripled this recipe and it took close to 70 minutes.  Just check to be sure the center is baked.

Tuesday, October 5, 2010

Homemade Pasta

I did it!  I made my own pasta.  No pasta machine involved.  Not difficult at all.  And possibly the only way I will ever eat pasta again.  Oh, and I made it gluten free too.  My father ate it too and could not stop talking about it.  He was super impressed when I then told him I made it.  And about 10 minutes later, he was shocked when I admitted it was gluten free.  It really didn't take much longer to make than when you open a box of pasta either.  Oh sure, the prep time is more.  But the cook time is only 3-4 minutes.  So it really comes close to even in the end.  I think with some practice, I should have it down to about 15-20 minutes.  Which is about the same time it takes to open and cook a box of pasta.  If you don't stop to take photos of every step, it should save you a good bit of time too.  But only a non-blog-aholic would dare to make pasta for the first time without photographic evidence!

Let me again say that I did not use a pasta machine.  I don't own one.  I might ask for the pasta attachment for my Kitchen-Aid mixer for Christmas.  Maybe.  I honestly don't really care if my pasta noodles are imperfect and a bit thicker.

If you can make sugar cookies, you can make pasta.  If you are gluten-full, just use regular AP flour instead of the GF flour.  I adapted this recipe from a few I found online.

GF Pasta that my dad is still talking about:

Ingredients:
2 cups GF flour mix (includes xanthan gum)
2 eggs
1 tablespoon evoo
1/2 tsp kosher salt
1/3 (or more) cup water

Directions:
* Dump first four ingredients in a food processor.  (you can totally do this by hand too if you do not have a fp)

* Turn on and stream in the water until dough forms into a ball.  You might need a bit more water.  If so, add a tiny bit at a time.


* Ball up and cover in plastic wrap.  Rest in refrigerator for 10 minutes.

* Lightly flour surface and rolling pin.  Cut dough in half and roll out as thin as possible.  Cut into desired shape with pizza cutter or knife.


* Toss in a bit more flour if noodles are sticking together.


* Add to salted, boiling water.  Cook for 3-4 minutes, depending on thickness.


Every recipe I found used either a pasta machine or a ruler to make picture perfect noodles.  That's just not something I care much about so mine are all wonky.  Tastes just as fabulous, I promise!

I didn't realize I was out of jarred pasta sauce until I put the dough in the fridge to rest.  Of course.  So I instead used one random can of sauce, one can of crushed tomatoes, one can of chopped clams and one package of frozen muscles.  It takes less than ten minutes in one pot for this to cook. 


Next week, I'm going to try making it pumpkin flavored.  Stay tuned.  I'm so sure y'all are just on the edge of your seats waiting.  Ha!